Not there yet, but it’s in reach: An Aftertouch, e.g. channel pressure control, retrofit for the Korg R3 synth.

I really like the Korg R3. No, there’s more: I bought it second-hand out of very rational considerations, and ‘ve come to love it deeply. There are people who don’t like it for its plastic housing, for the limitations in comparison with its more expensive sibling, the Korg Radias, others hate it simply for not being a first-generation Microkorg. In my experience, it’s an excellent virtual analog synth capable of doing massive bass as well as very unusual pads. It’s versatile, it’s compact, it’s cheap, and it sounds great. And unlike the Microkorg, it’s got a proper keyboard, albeit without aftertouch.
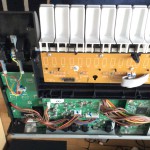
For some reason, the MIDI Thru jack in my R3 stopped working today, which is bothersome, but also a welcome excuse to open the R3’s housing and take a look inside. I had this idea of equipping it with an aftertouch sensor for even more variation and liveliness in playing. And now I’m confident it would work, although I won’t be able to do the mod for some time.
The basic idea was to take a couple of standard pressure sensors like the FSR-400 (have a look at the lovely Adafruit tutorial for this kind of sensors), and connect it using the R3’s pedal input. This input is supposed to be used for standard expression pedals, but of course you can use it as a generic analog input – the R3’s firmware allows you to route the control to almost any MIDI CC. There’s also some limited calibration to adapt the synth to different kinds of input.
The expression pedal jack has these signals on a standard 6.3mm plug:
- Tip: +3.3V
- Ring: CV In (in an expression pedal, this would be the connection to the output of the potentiometer
- Base: GND
My first idea was to put the sensors under the synth’s rubber feet – any pressure applied to the keyboard can be measured here, after all – but this wouldn’t work if the synth rest on a keyboard stand rather than on a table. And it would be much more elegant to put the circuitry into the housing.
-
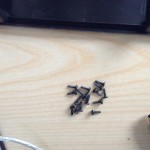
- Ah, screw it: You have to remove 17 screws. At least they’re identical.
-
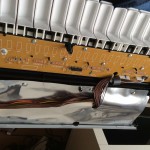
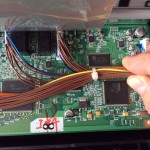
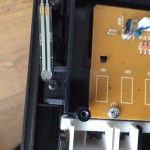
- The main board is shielded, you have to remove 3 more screws.
-
- Underneath: A DSP from TI.
-
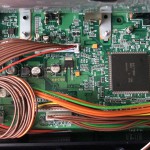
- Don’t know this VLSI.
-
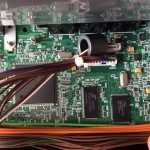
- A custom VLSI from Korg. Let me guess: this is where the synthesis happens. And some memory
-
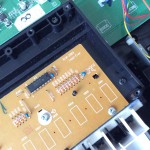
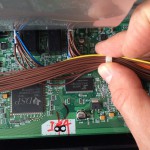
- Now this is interesting: The keyboard is attached to the housing with six more screws. Four just hold the back edge – and two screws to the left and to the right bear the force of the pressed keys. This is the one on the left side, next to the wheels.
-
- Its brother on the right.
-
- Now if we removed these screws and put a sensor underneath…
-
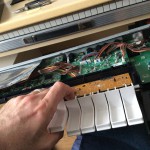
- …pressure on the keyboard would tilt it very slightly and could be measured.
-
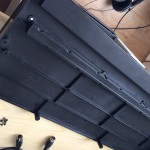
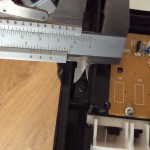
- But where should the keyboard – and the sensor – rest when the screws are removed? My suggestion: On this bar which seems to be prepared for an aftertouch sensor.
-
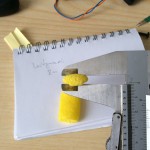
- I used my daughter’s playcorn to take a print of the dimensions with the housing closed – I’d suggest to take an 8x8mm gum stripe and put two sensors underneath, one to the left, one to the right. Alternatively, you can use an FSR stripe (link to Conrad shop here).
-
- Somewhere below here is the reason MIDI thru does no longer work.
Anyway: here is a couple of photos from the with notes how it might be done.
I do the same with my ipad dock. Attaching a crosffader or pressure sensor for finger drumming ;)
Great idea! Did you ever get it to work? Have had the exact same experience of the R3 you had. Love this little thing a whole lot more than the microkorg :) Very interested in weither aftertouch can be applied or not!
Hi Troels, thanks for the thumbs-up! I must admit that this is one of the many projects that I started but never quite finished – and two months ago, the R3 had to go when I bought my Waldorf Blofeld – but I sold it to a band mate so it’s still in the family :)
I’ve got a suggestion for you – to try an extremely low-tech approach: Buy two circular PSR-400 pressure sensors – they are about 8 € a piece – solder them in parallel, equip them with a trim pot and a 6.3mm plug, put them underneath the R3’s feet, plug the thing in – and have a look whether you can get something musically sensible out of that setup. If yes – we know where to put them, don’t we? :)
(Please: if you do, keep me in on your experiences.)